Minecraft
LuckPerms is a permissions plugin, one of the most widely used Minecraft server plugins, that lets you control exactly what commands and features each player or group of players can access on your Minecraft server. Once installed, Minecraft LuckPerms commands let you manage all of this without editing config files by hand. It works on Paper, Spigot, Purpur, Folia, Fabric, NeoForge, and most other plugin or mod compatible server types.
Installing LuckPerms on your Minecraft server
LuckPerms ships as different downloads depending on what your server runs. Bukkit-based server types install it as a plugin, while mod loaders install it as a mod. Use whichever section below matches your Server Type, which you can check or change under Change Version in the sidebar.
Installing the LuckPerms Plugin (Paper, Spigot, Purpur, Folia)
Here's how to install LuckPerms as a plugin if your server runs Paper, Spigot, Purpur, or Folia.
- Log into the Wabbanode Control Panel and open Add Content under Minecraft Tools in the sidebar.
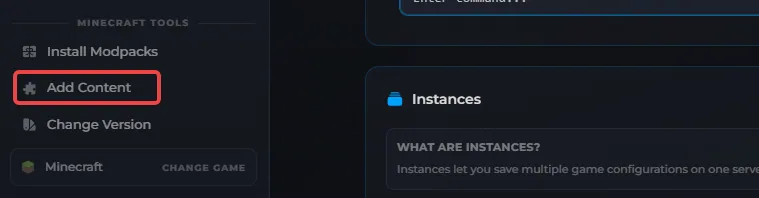
- Switch the content tab to Plugins and choose CurseForge or Modrinth as your source.

- Search for LuckPerms, then click Install next to it.

- Restart your server using the Restart button at the top of the panel. LuckPerms generates a
plugins/LuckPermsfolder with its configuration files on first launch.
Installing the LuckPerms Mod (Fabric, NeoForge, Forge)
Here's how to install LuckPerms as a mod if your server runs Fabric, NeoForge, or Forge. Your server needs to already be running one of these mod loaders, since Add Content only shows files matching your current Server Type.
- Log into the Wabbanode Control Panel and open Add Content under Minecraft Tools in the sidebar.
- Switch the content tab to Mods and choose CurseForge or Modrinth as your source.

- Search for LuckPerms, then click Install next to it. The panel installs the build matching your server's mod loader and version automatically.

- Restart your server using the Restart button at the top of the panel. LuckPerms generates its configuration files in the
configfolder on first launch, rather than theplugins/LuckPermsfolder used by the plugin version.
What Are the Basic LuckPerms Commands?
All LuckPerms commands start with /lp. Common ones include:
| Command | Description |
|---|---|
/lp user <name> permission set <node> true |
Grants a specific permission to a player |
/lp user <name> parent add <group> |
Adds a player to a group |
/lp group <group> permission set <node> true |
Grants a permission to everyone in a group |
/lp user <name> info |
Shows a player's groups and permissions |
/lp editor |
Opens a web-based permission editor |
/lp search <permission> |
Finds every user or group with a given permission |
What LuckPerms User Commands Should You Know?
Beyond the basics above, a few more /lp user commands are worth knowing for day to day management:
| Command | Description |
|---|---|
/lp user <name> permission unset <node> |
Removes a permission you previously set on a player |
/lp user <name> parent remove <group> |
Removes a player from a group |
/lp user <name> clear |
Wipes a player's permissions, groups, and meta back to default |
/lp user <name> clone <other name> |
Copies one player's entire setup onto another |
How Do You Set Up LuckPerms Groups?
Every player starts in the default group automatically, and LuckPerms recommends keeping that group rather than renaming it, since changing which group is "default" partway through a server's life can leave old players stuck in the wrong group. Give it a better display name instead with /lp group default setdisplayname Member, then build additional groups for staff or VIP tiers:
/lp creategroup moderator
/lp group moderator permission set essentials.kick true
/lp group moderator permission set essentials.mute true
/lp user Steve parent add moderator

How Do You Use the LuckPerms Web Editor?
Running /lp editor generates a link to the LuckPerms web editor, a browser-based tool that's far easier for managing complex permission trees than typing individual commands.

Add or edit permissions, parents, prefixes, and weights in the browser, then click Save to get a command to run in-game or the console that applies your changes.
Most plugins list their exact permission nodes on their own documentation or Spigot page. Check the plugin you want to restrict for its specific node names before setting rules in LuckPerms.
What Other Features Does LuckPerms Have?
A few more parts of LuckPerms are worth knowing once the basics are set up:
- Context: Restricts a permission, group, or prefix so it only applies under certain conditions. LuckPerms includes a
worldand aservercontext by default; other plugins can add further contexts, such as gamemode. Add one to the end of any command askey=value, for example/lp user Steve permission set essentials.fly true world=creative_build. - Weight: Decides which group wins when a player belongs to more than one with conflicting permissions, or which prefix or suffix shows when a player has several. Higher numbers take priority. Set it with the
/lp group <group> setweight <number>LuckPerms setweight command. - Prefixes, Suffixes, and Meta: LuckPerms can store the prefix and suffix text other plugins show in chat and on the tab list, plus custom values like a player's home limit. LuckPerms does not display any of this itself, so pair it with a Vault compatible chat plugin such as EssentialsX Chat to actually show prefixes in game. Prefixes typically use Minecraft color codes to stand out, for example
&6[Mod]. - Verbose: A live diagnostic tool for permission checks. Run
/lp verbose on <player>before the player tries the action in question, then read the console output to see exactly which permission was checked and what LuckPerms returned. - Tracks: An ordered list of groups, such as default, helper, mod, and admin, that lets you promote or demote a player one step at a time with a single command. Create one with
/lp createtrack staff, add groups with/lp track staff append <group>, then promote a player with/lp user <name> promote staff.
Using LuckPerms Database Options
By default, LuckPerms stores its data in a local H2 file that needs no setup. If you run more than one server and want permissions to stay in sync between them, switch to a shared database such as MySQL or MariaDB instead.
Set storage-method in the config file and fill in your database's address, name, username, and password. You can create a MySQL database from the Databases tab in the Wabbanode Control Panel. LuckPerms can also store data as plain YAML or JSON files if you'd rather edit permissions by hand, though this is more prone to mistakes on a larger server.
Changing LuckPerms Configuration Settings
LuckPerms' settings, sometimes called the LuckPerms config, live in config.yml (or luckperms.conf on some platforms) inside its plugin folder, editable through the Files tab. The two settings changed most often are storage-method (see LuckPerms Database Options above) and server, which names this server for server-specific permissions if you're running a network. Most other options are safe to leave at their defaults unless you have a specific reason to change them.
This guide covers everyday use. LuckPerms goes a lot deeper for larger networks and custom setups, including the full command reference and configuration options. Visit the LuckPerms wiki for the complete documentation.
LuckPerms is now installed, and you're ready to use its commands to manage permissions on your server.